Prime Radio Stream is an online radio platform for creating, managing and sharing a live internet station. You can broadcast live from an Android phone or a computer, publish podcasts, and use Auto DJ to keep audio playing between live shows.
What you need
A stable internet connection. Wi-Fi, fibre or reliable mobile data can work.
An Android phone for Prime Broadcaster, or a computer with compatible broadcasting software.
A microphone or headset for live speech. Headphones help prevent echo.
Your own properly licensed audio content.
You do not need expensive studio equipment for basic use. A phone, a stable connection and a headset are enough to begin.
Enter your first name, last name, email address and a password of at least eight characters.
Open the verification email and follow its link, or enter the six-digit verification code.
Go to Log in and enter your verified email address and password.
Complete the account, plan and station launch steps shown after login.
If the verification email does not arrive, check spam or use the resend option on the verification page.
3. Create your radio station
After registration, complete the guided account and plan steps. You can later use Dashboard → Add station if your plan allows more stations.
Enter a station name, tagline, genre, country/location and optional website address.
Upload an optional JPG, PNG or WebP logo. The current limit is 5 MB, from 500×500 to 3000×3000 pixels.
Review the automatically generated station slug. A slug is the unique, URL-friendly part of your public address.
Save or launch the station.
Each station receives a unique public listening page. You can copy that link from the station tools and share it without sharing broadcaster credentials.
4. Choose a plan
Plans are managed by Prime Radio and may change. The current active options below are read directly from the platform database, so this page does not keep a separate price list.
PayFast Sandbox Monthly
ZAR 10.00 / month
Fake plan for isolated PayFast sandbox testing only.
1 station(s)Unlimited listening hoursUnlimited podcastsUnlimited Auto DJ tracksUnlimited kbps maximum
When a trial or paid subscription expires, broadcasting and subscription-dependent tools are restricted and the station can be taken offline. Choose a plan from Dashboard → Plans to reactivate it.
5. Understanding the dashboard
Area
What it does
Dashboard / station
Shows stream status, station access and setup controls.
Station status
Shows ON AIR for a live source, AUTO DJ when automated audio is playing, and OFF AIR when neither is connected.
Listeners / Analytics
Shows current listeners plus available listening sessions, listening time, peaks and audience locations.
Broadcast settings
Displays the private connection details used by mobile and desktop encoders.
Auto DJ
Uploads, orders, previews and shuffles the station playlist, and enables automated playback.
Podcasts
Creates draft or published episodes from an upload or external audio URL.
Finance / Plans
Shows plan, subscription status, renewal date and upgrade options.
Prime Radio / Players
Manages public station information, artwork, app links and embeddable player URLs.
Need Help?
Opens the support-ticket area for account, billing or technical assistance.
6. Stream connection details
Prime Broadcaster fills these settings automatically. Sign in to the Android app with your Prime Radio account and select your station. The app loads its broadcast connection details for you. Manual copying is for other encoders or manual profile setup.
To view your settings on the website, log in and open Stations → your station → Settings, or select Broadcast settings on the station page. Copy the values displayed there; every station has its own details.
Server / host
The dashboard currently displays stream.primetechnologies.co.za.
Port
Copy the station-specific stream port.
Mount point
Copy it exactly, including its leading slash if shown.
Username
Use the source username shown in Broadcast Settings.
Password
Use the stream/source password—not your Prime Radio account password.
Format
In Prime Broadcaster, use the format loaded by the app. For manual computer setup, use MP3 unless your dashboard or support team specifies otherwise.
Bitrate
Choose a value no higher than the maximum on your current plan.
Do not share your stream password publicly. Listeners never need it. Copy credentials only into your trusted broadcasting app or software.
7. Broadcast from the Prime Radio mobile app
Prime Broadcaster turns an Android phone into a small live studio. Sign in with your Prime Radio account, select your station, and let the app fill in your broadcast settings.
Open Prime Broadcaster and use the login option. Enter the same email address and account password you use on the Prime Radio website.
Select the station you want to broadcast to. If your account has several stations, check that you have selected the correct one.
The app automatically fills in the station's host, port, mount point, source username and source password, along with the server type and audio connection settings. Wait for these settings to load before starting your stream.
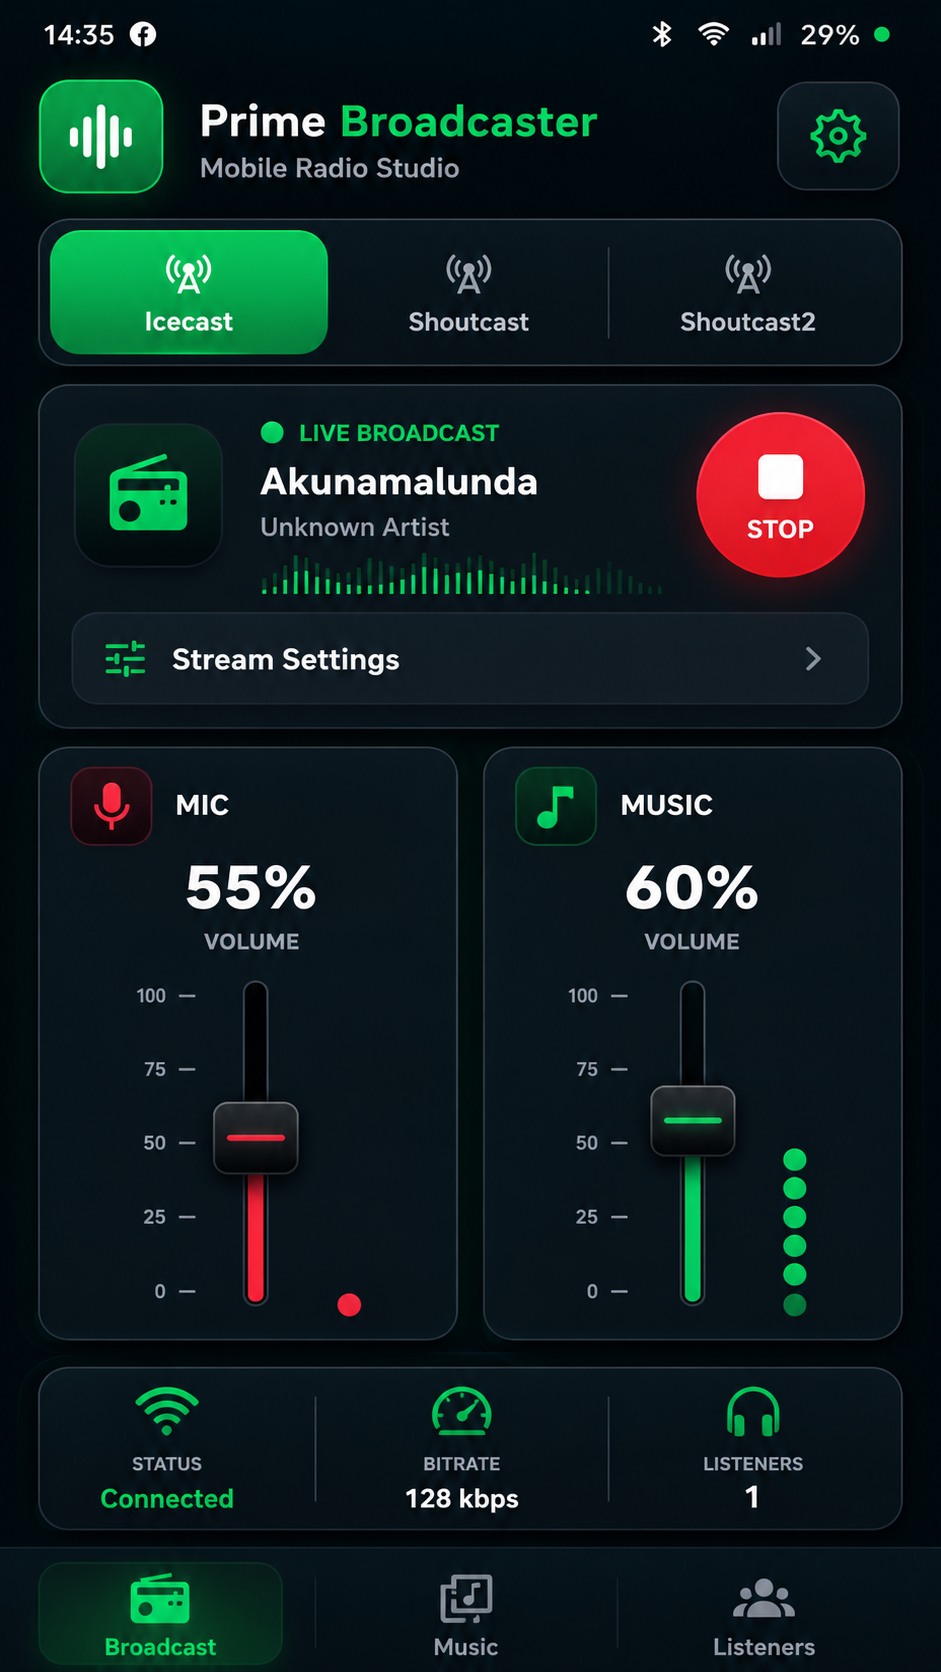
Allow microphone access when Android asks. Review your microphone and music levels on the Broadcast screen, then start the broadcast.
Check that the status shows Connected and test your public station player to confirm listeners can hear you.
Two different passwords: use your account password to sign in. The app loads the separate stream/source password automatically for your selected station. You do not need to copy it from the dashboard during normal app setup.
What the app fills in
Setting
How it is supplied
Host, port and mount point
Loaded from the selected station's broadcast configuration.
Source username and password
Loaded for the station your account has access to.
Server type, format, bitrate and TLS / SSL
Loaded with the connection configuration. Review the bitrate against your plan limit before going live.
If no station appears, finish creating your station on the website or ask the station owner to check your account's station access. If broadcasting is disabled, check your station and subscription status in the dashboard. If your login expires, sign in again.
Manual profile setup, if needed
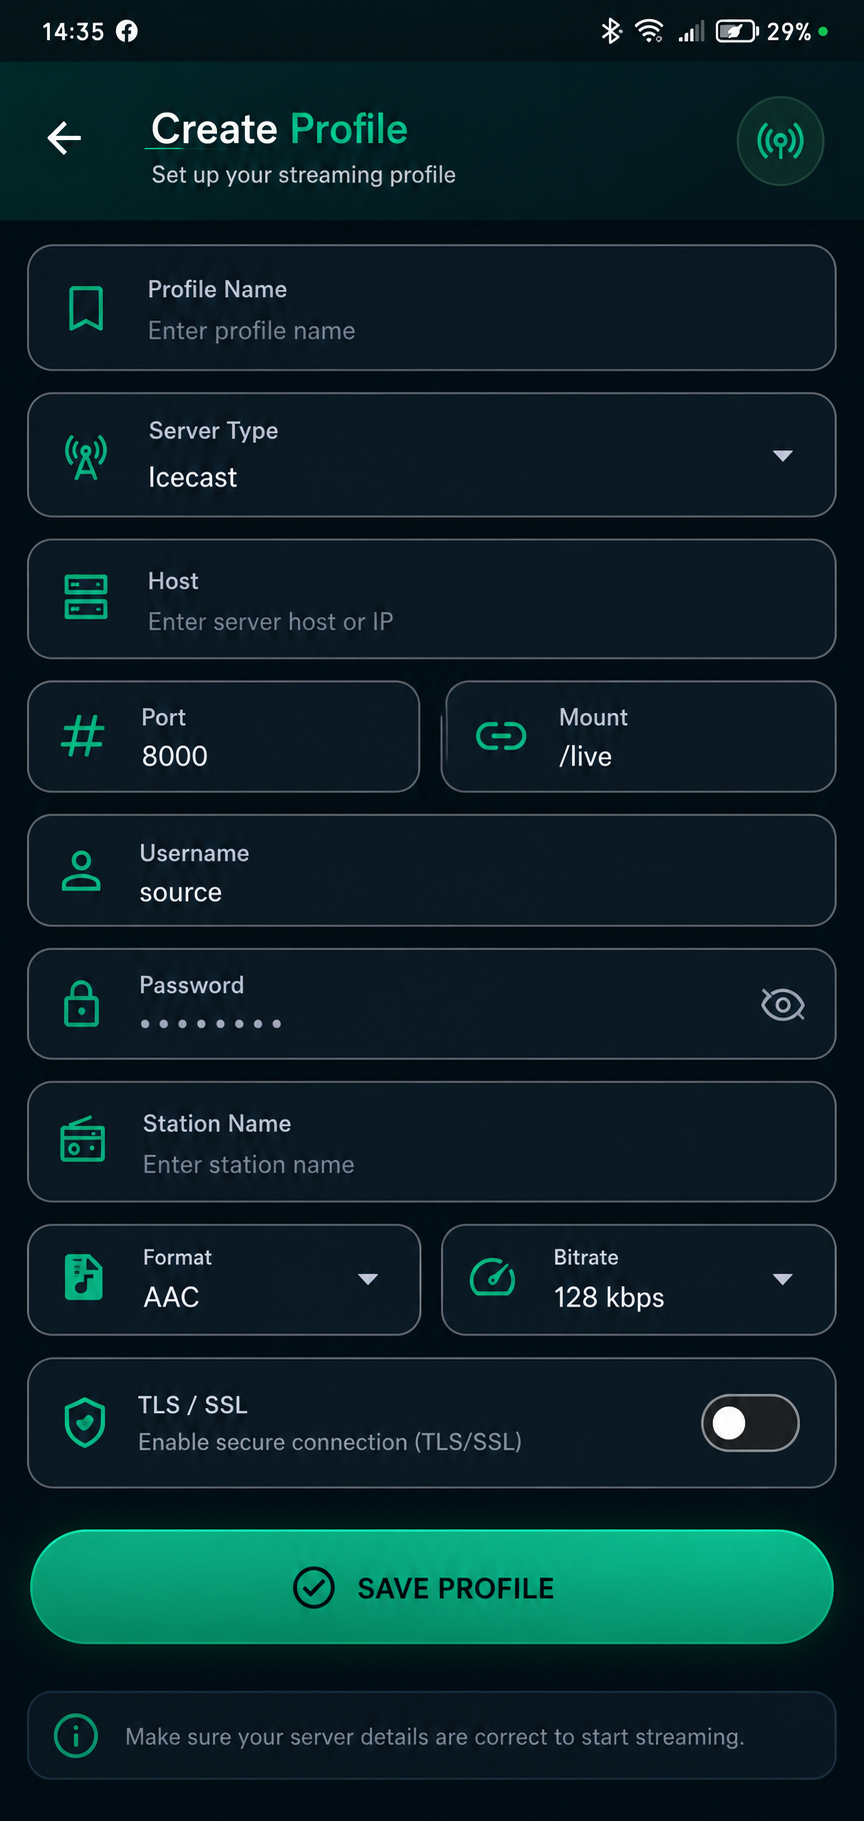
Use this option for a manual connection. The screenshot below shows the manual profile screen, not the new login flow.
Open Stream Settings and select Create Profile.
Name the profile and choose Icecast. Copy the host, port, mount, source username and source password from your station's Broadcast Settings.
Use your station's audio and TLS / SSL settings, keep the bitrate within your plan limit, then select Save Profile.
Manual setup onlyAfter login and station selection, the app fills the connection settings automatically. Use your own dashboard values if configuring this form manually.Start and monitor the broadcastUse your selected station's loaded settings. Check Connected, the bitrate and listener count; tap the red Stop button when finished.
Keep your passwords private. Do not share your account password or screenshots containing stream credentials.
Control your live sound
On the Broadcast tab, use the MIC and MUSIC sliders to balance your voice and track audio. If the music is much louder than the presenter, lower MUSIC first and increase microphone gain gradually. Avoid pushing either channel into distortion.
Use the microphone mute control for music-only moments. Check the level indicators before speaking and use headphones to prevent echo.
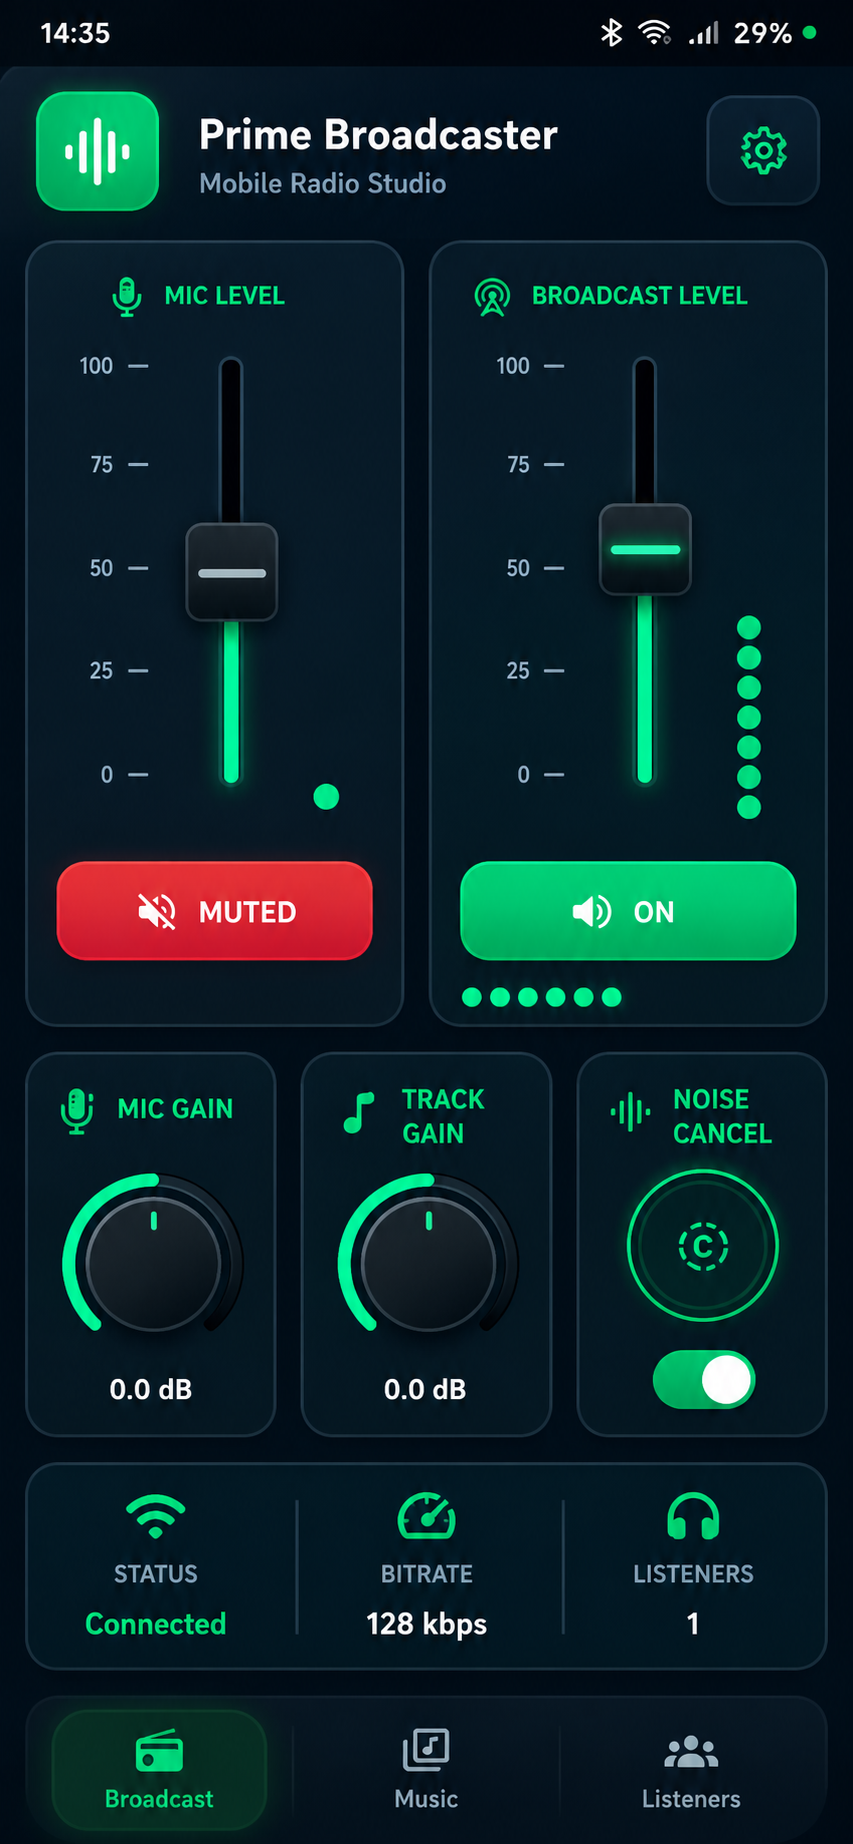
Open the detailed mixer to adjust Mic Gain, Track Gain and Noise Cancel. The presenter voice should remain clear above the music; use microphone gain/boost carefully rather than running the music at maximum volume. Noise cancellation can help with steady background noise, but switch it off if it makes speech sound unnatural.
Watch Status while live. If it no longer says Connected, stop, check the network and reconnect before continuing.
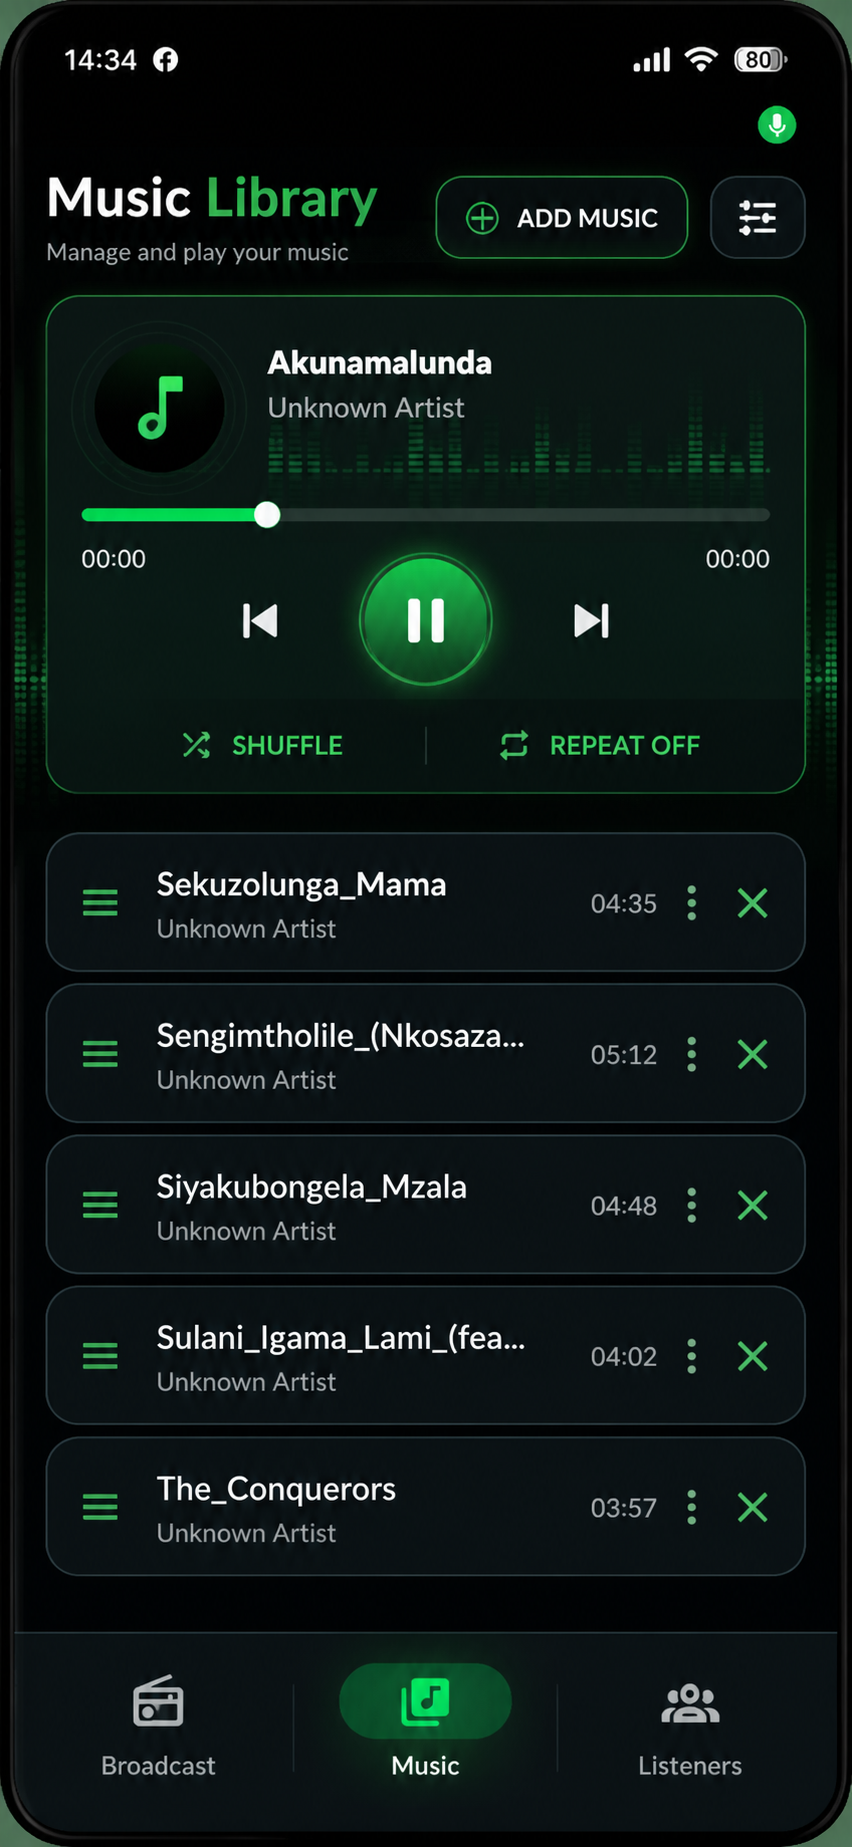
3. Mix voice and musicAdjust mic and broadcast levels, mute the microphone when needed, and fine-tune gain or noise cancellation.4. Prepare musicOpen Music, tap Add Music, choose tracks you have permission to broadcast, then play, reorder, shuffle, repeat or remove them.
Finish the show safely
Tap the red Stop button and wait for the app to show that it has disconnected.
Return to the web dashboard and confirm the station is no longer live, or that Auto DJ has resumed if it is enabled.
Mobile data or Wi-Fi is required for the whole broadcast. Streaming can use significant data and battery power; stable Wi-Fi and a charger are recommended for longer shows.
8. Broadcast from a computer
Starter (R299/month) includes Mobile App Broadcasting, AutoDJ, Online Radio Streaming and Listener access. Prime and Premier also include Windows Broadcaster Software. Upgrade your plan to use Prime Radio Broadcaster for Windows, then download it from your dashboard.
Keep Broadcast Settings open in your browser and copy its values. Menu names can vary slightly between software versions.
A. VirtualDJ
Open VirtualDJ and its Broadcast settings.
Choose Radio Server and Icecast when offered.
Enter the dashboard server, port, mount point, source password and username if requested.
Select MP3 and a bitrate within your plan limit.
Connect, then verify ON AIR in Prime Radio.
B. BUTT (Broadcast Using This Tool)
Install BUTT from its official source, then open Settings.
Under Server, choose Add and select Icecast.
Enter the address, port, source username, password and mount point from Prime Radio.
In Audio, select your input device, MP3 format and an allowed bitrate.
Save, connect and check the dashboard status.
C. Mixxx
Open Preferences → Live Broadcasting.
Select Icecast and enter the host, port, login/source username, password and mount point.
Choose MP3 and a bitrate within your plan limit.
Enable live broadcasting, then verify ON AIR in Prime Radio.
Do not use sample credentials from a tutorial. Always copy your own station values from the Prime Radio dashboard.
9. Auto DJ
Your station can stay online even when your computer or phone is off.
Open Stations → your station → Auto DJ.
Upload at least one supported audio track, or add a published podcast episode.
Arrange the playlist and switch Shuffle on or off.
Select Enable Auto DJ.
Confirm the Auto DJ status is enabled and check your station page.
Auto DJ plays when there is no live broadcaster. A live source can take over; after the live broadcast disconnects, Auto DJ takes over again. The current interface supports playlist ordering, shuffle and restart. It does not provide a scheduling interface, so this guide does not promise timed programming.
10. Uploading music and Auto DJ content
Open your station's Auto DJ page and select Upload.
Choose up to 50 files per batch. Supported formats are MP3, AAC, M4A/MP4 audio, OGG, WAV and FLAC.
Keep every file at or below 100 MB.
Wait for the upload to complete. Invalid or unreadable audio is rejected.
Drag tracks into order, edit their title/artist/album information if needed, or enable Shuffle.
Enable Auto DJ when the playlist is ready.
Your plan sets the maximum number of Auto DJ tracks. There is currently no customer-facing schedule editor.
11. Podcasts
Open Dashboard → Podcasts → New podcast.
Enter an episode title and optional description.
Add the episode cover image/artwork when the podcast form provides that option. Use clear square artwork that remains readable on smaller screens.
Upload an MP3, AAC, M4A, OGG, WAV or FLAC file up to 100 MB, or supply a valid external audio URL.
Choose Draft to keep it private in your workspace or Published to make its audio available.
Select Create episode. You can later edit the title, description and status.
Use Open audio on a published episode to copy and share its direct audio link, or add that published episode to Auto DJ.
Podcast count limits follow your current plan. Published episodes can appear on the station public page with their cover artwork and play control when those details are configured.
12. Weekly schedule
Use the station schedule to publish the programmes listeners can expect throughout the week.
Log in and select the station you want to manage.
Open the station Schedule area from the dashboard.
Select the day of the week, from Monday through Sunday.
Add the show name and its start/end time using the fields available in your dashboard.
Save the show and check the public schedule page.
Days without a programme can display a message such as No shows scheduled. The public schedule also gives listeners a way to return to or play the station.
Keep the schedule current. If a programme changes permanently, update the saved show rather than relying only on social-media announcements.
13. Presenters and shows
Stations can use presenter information together with their programmes so listeners know who is hosting a show.
Open your station management area and go to the presenter/show controls available for the station.
Add the presenter details requested by the form.
Create or update the presenter's show and place it on the appropriate day and time.
Save the changes and check the public station/schedule pages.
Use a clear presenter name and show title. If presenter artwork or profile information is available in your station interface, use good-quality images and keep the information up to date.
14. Live listener chat
The live chat lets listeners send messages to a station while they are listening. The broadcaster can view the station's incoming messages from the broadcaster/dashboard chat interface.
For listeners
Open the station's public listening page.
Find the live chat area.
Enter the listener name requested by the page and type a message.
Send the message. Keep messages respectful and relevant to the broadcast.
For broadcasters
Open the station's chat/message area in the broadcaster dashboard.
Read new listener messages while broadcasting.
Use the available moderation controls for unwanted messages, including deleting or blocking where those controls are shown.
Clear old conversation history when preparing the chat for a new programme if your station's chat controls provide that action.
Do not use public chat for passwords, payment information, verification codes or other private account information.
15. Public station player
Each station has a public listening page that can combine its live stream with station branding and listener features.
Feature
What listeners see or do
Logo and cover artwork
Station branding displayed on the public page when configured by the station.
Live status
Shows whether the station is live/online according to the platform status.
Custom live player
Listeners can play or pause the live stream, use the volume control and see the waveform-style playback display.
Weekly schedule
Opens the station's published programme schedule.
Podcasts
Published episodes can be presented on the public page for listeners to play.
Live chat
Listeners can interact with the station where chat is enabled.
Support/app links
Donation, app-store or other listener links appear only when the station has configured the corresponding options.
Use Prime Radio → Players in the dashboard to open the public player for your selected station.
16. Social links
Add the station's official social and contact links in the station settings where those fields are available. These links can then be displayed on the public station page.
Use the station's official Facebook, Instagram, YouTube, TikTok or other configured social profile—not a presenter's personal profile unless that is intentionally the station account.
Use the correct WhatsApp/contact link configured for the station.
Test every link after saving it.
Remove outdated links instead of leaving listeners with broken destinations.
17. How listeners connect
Open your station tools and copy its public station URL.
Share the link with your audience.
The listener opens it in a phone or computer browser and taps Listen live / Play.
The player continues while the listener browses the Prime Radio listener area.
Listeners do not need your broadcasting credentials. Never send them the source username or stream password.
18. Listener experience
The currently published listener experience is available at Prime Radio Listen in a mobile or desktop browser. No separate listener APK is currently linked by the platform.
Browse stations or select Search and enter a station name.
Open the station and tap Listen live.
Tap the heart to add it to Favourites.
Use Recent to return to stations played on that device.
On supported phones, browser audio can continue when you change apps or lock the screen. Device battery and browser policies may pause playback.
19. Share your station
WhatsApp: paste the public station URL into a chat, group or Status.
Facebook: create a post with the public URL and a short description of your programme.
Your website: link to the station page, direct stream or use the player/widget tools in the dashboard.
Share button: the listener station page uses your device's native share sheet when supported, or copies the URL.
QR code: a station QR code is available only when its owner configures saved app-store links in Prime Radio settings. Do not promise one until it appears on your public page.
Use the public station or listener-page URL for ordinary sharing—not the private broadcast server details.
20. Subscriptions and payments
Your trial starts when the station is launched; its exact length comes from the selected plan.
Open Dashboard → Finance to see the current plan, status and renewal or trial-end date.
Open Dashboard → Plans to compare plans and choose a paid monthly subscription.
Complete the secure PayFast checkout. Return to Prime Radio after payment and allow a short time for confirmation.
Keep the payment method current for renewal.
If a trial or subscription expires, streaming and subscription-dependent features are restricted and the station can go offline. To reactivate, log in, open Plans, select an available paid plan and complete payment. If a successful payment is not reflected, submit a support request with the PayFast reference—never include card or banking credentials.
21. Troubleshooting
Problem
Checks
Station is offline
Confirm the subscription is active. Start Auto DJ or connect one live broadcaster. Refresh the status after 15 seconds.
Cannot connect broadcaster
Copy all five fields again from Broadcast Settings. Check that the port is numeric and the mount begins exactly as shown.
Wrong password
For app login, use your website account email and password. For a manual encoder profile, use the separate stream/source password from Broadcast Settings. Avoid spaces added while copying.
No login option in the app
Install the latest Prime Broadcaster from the official download link above.
No stations or settings after login
Complete station setup on the website and confirm your account has access to the station. Check your network and select the station again. If the app reports that credentials are disabled or the broadcast password cannot be loaded, contact support with the error message.
Microphone not working
Allow microphone permission, select the correct input, disconnect Bluetooth devices you are not using, then restart the app/software.
Music is loud but microphone is too low
Lower the MUSIC/track level, increase MIC or Mic Gain gradually, speak close to the microphone and watch the input meter. Avoid excessive gain that causes clipping or background noise. Use headphones to prevent feedback.
No sound
Check input meters, unmute the microphone/channel, choose the right audio device and confirm the player volume is up.
Listeners cannot hear audio
Verify ON AIR or AUTO DJ, test the public page in a private browser window, and confirm the encoder is sending supported MP3 audio.
Auto DJ not starting
Ensure the subscription is active, the playlist has a readable track, Auto DJ is enabled and no live source is still connected. Try Restart.
App cannot connect
Check your internet connection, sign in again if your login has expired, select the correct station and wait for its settings to load. Check that broadcasting is enabled and your subscription is active. For a manual profile, compare the connection details with your dashboard.
Stream keeps disconnecting
Use a more stable network, reduce bitrate within your plan, disable battery/data saving for the broadcaster, and avoid VPN changes.
Internet/mobile data problems
Run a connection test, move to stronger coverage, stop other large uploads, or use Wi-Fi/fibre.
VirtualDJ cannot connect
Select Radio Server/Icecast, verify host and port are separate, enter the exact mount and source password, then try an allowed MP3 bitrate.
If these checks do not solve it, include your station name, device/software version, time of failure and the exact error message in a support request. Do not attach your stream password.
22. Frequently asked questions
Does my computer need to stay on?
Not when Auto DJ is enabled with playable content. A computer or phone must remain connected only for a live broadcast.
Can I broadcast from my phone?
Yes. Install Prime Broadcaster on a compatible Android phone, sign in with your Prime Radio account, select your station and start broadcasting after its settings have loaded.
Do I need to type the broadcast settings into the app?
No. After you sign in and select your station, Prime Broadcaster automatically fills the host, port, mount point, source username, source password and audio connection settings. Manual setup remains available when needed.
Which password do I use to log in to Prime Broadcaster?
Use the same account password as the Prime Radio website. The separate stream/source password is loaded automatically for your selected station.
Does broadcasting use data?
Yes. Live audio continuously uploads data. Wi-Fi is recommended where possible.
Can I use VirtualDJ?
Yes. Use Radio Server / Icecast and copy the station details from the dashboard.
Can I use Mixxx?
Yes. Configure its Live Broadcasting section with your Prime Radio Icecast details.
Can listeners use a mobile app?
They can use the mobile-friendly Prime Radio listener site. No separate listener APK is currently linked.
What happens when my trial ends?
Subscription-dependent streaming and tools are restricted until you activate a paid plan.
Can I change my station name?
Yes. Use the Prime Radio station settings. The public slug is a separate field; change it carefully because old shared links may stop working.
Can I share my station on Facebook?
Yes. Share the public station URL, never the broadcaster credentials.
Do I need expensive equipment?
No. A phone or computer, stable internet and a basic microphone/headset are enough to start.
Can Auto DJ keep my station online 24/7?
Yes, while your plan is active, Auto DJ is enabled and its playlist contains playable content.
23. Support
Logged-in customers should use Dashboard → Need Help?. Select a category, describe the problem, and attach an optional screenshot or file. You can track replies and continue the conversation in the same ticket.
For quick help while browsing, use the public chat widget where it is available. General public enquiries can use the support email already published on the main website: support@primetechnologies.co.za.
Never send passwords, card numbers, banking login details or verification codes in a support ticket or chat.
16. Social links
Add the station's official social and contact links in the station settings where those fields are available. These links can then be displayed on the public station page.